
When I think of the adjustments I’ve made that really help accounts not only perform well, but also have cleaner data, these are changes that make my list. So here are 5 things that I’ve seen boost performance that you can implement that should help your account see cleaner conversion data at a minimum
1. Enhanced Conversions
Enhanced conversions is a feature that Google provides to improve accuracy of conversion measurement that helps with bidding. It essentially provides more data (“hashed first party data”) to Google to optimize your campaigns for if you’re using an automated bidding strategy.
How it works
Whenever a customer converts on your site you receive first party data such as email addresses, names, home addresses, and phone numbers. Google hashes this to make it secure and then uses it to enhance your conversion measurement. For web conversions like the purchasing of a product, it improves your measurement of online conversions. Google takes that data and matches it to a customers google account if they were signed in when the purchase took place. For lead generation it can match the data from offline conversions like a phone call or email to the user that visited your site.
How to set it up
There are 3 ways you can set up enhanced conversions on your site. Through Google tag manager, Google tag (Different from tag manager in that it only supports Google tracking and not 3rd party tracking like tag manager), and Google Ads API. In a later blog post we can cover in depth on how to install these but for now I will link the instructions.
How to measure results
Once you set it up you’ll have to wait a few days. But once the wait is over, you can go to your conversion tracking page in your ads account. In the “Status” bar of the conversion action you’ll see “Recording (processing enhanced conversions)”. Enhanced conversions currently need 30 days of data before it’ll start to impact your reporting. Once that period of time is over you can click the “Active” text in the status bar, where you’ll see “enhanced conversions is active” with a button to “view impact”.
2. Filter the users you’re targeting
Usually when setting up location targeting we think “now that I’ve selected the location I’m done”. This couldn’t be farther from the truth. Google automatically selects the location settings of “People in, regularly in, OR who’ve shown interest in your targeted locations” I’ll tell you why this is bad and how it can be costing you money right now.
Why it’s important to filter
If we leave the setting to “People in, regularly in, or who’ve shown interest in your targeted locations” then we are basically telling Google to show our ad to whoever is interested in our targeted location. For example, say we are only targeting the US with our ads. Someone searching in Canada, EU, UK, or Asia could be searching for a product you offer. You only intend to ship to a US address, but your ad still shows up. If they click on it, you will be billed even though that user is not in the US and can’t purchase your product/service.
How to adjust your targeting settings
Go into your Campaign settings, then click on the “Locations” tab. Under your targeting options you’ll see a “Location Options” dropdown. Click on that and then change your target to “Presence: People in or regularly in your targeted locations”. This will now change your targeting to only show for users who are searching in your targeted locations. You may not have spent a ton outside of your targeted location, but every dollar can add up.
3. Segment Brand vs Acquisition in Performance Max campaigns
Performance Max is one of Google’s newer campaign types. It’s been around since November 2021 and it’s here to stay for the foreseeable future. It’s a bit of a black box when it comes to data. It will share certain insights with you like search categories, auction insights, and top performing audiences. But we don’t really get a choice to segment brand searches from acquisition searches. There are tools like brand exclusion lists but that doesn’t completely eliminate brand searches. Recently, I’ve learned of an additional way to further separate brand from acquisition in performance max and I’m happy to share.
What are the benefits of segmentation?
When it comes to search campaigns it’s incredibly important to segment between brand and acquisition searches. Brand tends to be much cheaper, higher CTR, and brands usually dominate the impression share fight. So if it’s important for search, why wouldn’t we want to do it in our Performance Max campaigns? I’d argue that it is just as important. With Performance max being favored by Google, we want to make sure we can still retain as much control over this segmentation as possible. It helps us see incrementality in our campaigns, and we get to see a more accurate representation of our BoF vs MoF/ToF efforts.
How to improve segmentation
In addition to adding a brand exclusion list (which can be done in the shared library under “Brand Lists”) we can add negative keyword lists. Currently the only way to do this is to reach out to your google representative to add it into your campaign. Luckily since this list is something you can add to, once it’s installed you can always modify it. I’m hoping that soon there is a way we can do this in the platform but for now this is the only way I know of to do this.
4. Campaign Structure – Best ways to segment?
How you structure your campaigns can have an affect on your account. Similar to breaking out both ACQ and Brand campaigns like discussed above. How you structure depends on your factors like your industry, products, seasonality, etc. Lets dive into some ways we can structure campaigns. This only applies if you have enough products to segment. At the end of the day, use whatever structure works best for you. But it’s important for your account to be structured by themes/goals.
By Product Type
This is most often how I like to break out my campaigns. The benefits to this are that you can optimize based on product trends much easier. It also helps you see which product types perform better than others, and we can optimize these groups to be efficient within their spend limits. It also allows our asset groups to be hyper focused with the creative and copy we use in our campaigns which can lead to overall better performance and customer experience.
By Season
This is a structure that can either be used by itself or in addition to product type. If your products rely heavily on seasonality, say around gifting seasons, or holidays. Or if you have product launches for specific seasons like spring, summer, fall, etc. Usually I will use this in addition to product type if we have new seasonal products coming out.
By Top & Low performers
This structure allows you to give your top performers more budget to work with, and allows you to aim for specific tROAS goals that might be a bit higher but can be achieved due to products performing well. At the same time it allows you to see up and coming products that can be switched into a top performing campaign.
5. Product Titles
Product titles are extremely important when it comes to how customers view your product. We optimize titles mostly for acquisition purposes. Yes, your product data is used to match you with queries, but does your title speak to the search query? Does it address the need of the consumer? How else can we optimize these titles?
Structure
How we structure titles determines the experience a user has with our ad. In the image below I searched “leather couch” and these 4 ads pulled up. 3 of these titles have “leather” in the visible text. Check. The first item on the far left is a swivel armchair. Not what I am looking for, so I can rule that out. Poly & Bark do a great job here. The first thing I read is “brown leather couch” which shows both color and general search query. The next ad shows “extra deep seating” and “Italian leather” which are both acquisition type searches.
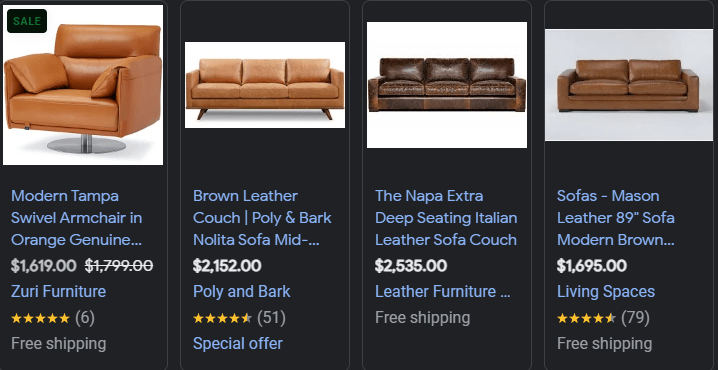
I like to separate my text when I am talking about different things so it can easily translate the starting and stopping point of certain information. The Napa example above has no stops. It is just 1 big group of text. I like Poly & Bark for their structure here. Separating sections with a “|”. If I am searching for a brand, depending on the product, I know the name of what I am looking for in addition to the brand name, so it’s important we make the titles accessible for our non brand searches and showcase the most important information first.
What should I include?
Things that should be included are USP’s, materials, colors, size (if apparel), or other important information. We need to get inside the users head for this. If I am selling apparel, I know material of product, and color are important for acquisition searches. If I am selling furniture, customers look for color, product type (sectional, loveseat, etc), material, design, and even decoration style. Some of these are addressed in the actual title of the product, but if we are missing important information that is important to a product we offer, we miss out on searches.
Is testing important?
Testing is vital to improving product title quality. There are a lot of ways we can change titles to improve them. Whether that be adjusting the sequence, adding new text, or removing text. As with all other testing I suggest you focus on incrementality. Make one tiny change at a time. If we make too many adjustments in a single test, we can’t for sure say which change affected the data. Depending on spend and traffic, you can test from 30+ days. Make sure your data is driving the decision. It’s important not to cut testing short. Take into account seasonality, promotions, etc. when testing.
In Conclusion
I hope these tips help you on your way to improving your account. They’re just a few things I’ve learned along the way that have helped me create winning strategies for my clients. Feel free to peruse my other blog posts if you’ve found this one helpful.

Leave a comment